DIY Kitchen Decor Jars: 5 Creative Ideas!
Transforming your kitchen from bland to beautiful doesn’t have to break the bank. One of the easiest and most cost-effective ways to add personality and charm to your space is by using DIY kitchen decor jars. These versatile items can be upcycled and repurposed in countless ways, offering both functionality and style. From herb gardens to soap dispensers, jars are a fantastic medium for showcasing your creativity. In this guide, we’ll explore five unique DIY ideas that will inspire you to revamp your kitchen decor using simple materials and easy-to-follow instructions. Get ready to unleash your inner crafter and breathe new life into your kitchen!
Idea 1: Painted Herb Jars
Bring the freshness of herbs into your kitchen with these charming painted herb jars. Not only are they functional, but they also add a touch of rustic elegance to your windowsill or countertop. This project is perfect for beginners and requires minimal effort for maximum impact. Imagine the delight of having fresh herbs readily available for cooking, all while enjoying the beauty of your handmade decor. These painted jars will undoubtedly become a conversation starter and a focal point in your kitchen. The best part is you can customize the colors to match your kitchen’s existing decor, making it a truly personalized project.
Materials Needed

To get started with your painted herb jars, gather these supplies. You’ll need clean glass jars of various sizes, acrylic paint in your chosen colors (consider using a combination of colors), paintbrushes of different sizes (including fine-tipped brushes for detail work), painter’s tape (optional, for creating patterns), a pencil and eraser, and some potting soil and herb seedlings. For the best results, choose acrylic paints specifically designed for glass or surfaces. This will ensure the paint adheres well and lasts longer. Also, select paintbrushes with soft bristles to avoid leaving brushstrokes. Consider using a primer to make the color more vibrant and long-lasting. Ensure you have good quality painter’s tape to create clean lines if you plan to create geometric patterns.
Step-by-Step Painting Guide
Begin by thoroughly cleaning the glass jars, ensuring they are free of any dust or residue. If you’re using painter’s tape to create patterns, apply it now, ensuring it’s firmly pressed down to prevent paint from seeping underneath. Next, apply the first coat of paint, using even strokes. Allow the first coat to dry completely before applying a second coat, which will provide better coverage and a more vibrant finish. Depending on the paint’s opacity, you might need a third coat for optimal results. After the paint is completely dry, carefully peel off the painter’s tape if you used it. You can also add decorative touches like dots or stripes, using the fine-tipped brushes. Once the paint has dried, your herb jars are ready for planting.
Adding Labels & Personalization
Personalize your herb jars with labels to easily identify each herb. You can use chalkboard labels, adhesive labels, or even paint the names of the herbs directly onto the jars. For chalkboard labels, use a chalk marker to write the herb names. If you choose adhesive labels, ensure they are waterproof and durable, as the jars will be watered regularly. Another creative option is to use stencils or freehand painting to add the herb names. Consider adding decorative elements like ribbons, twine, or small charms to further enhance the jars’ aesthetic appeal. The labels and additional decorations are the finishing touches that make your herb jars truly unique and reflect your personal style.
Idea 2: Rustic Twine-Wrapped Jars

Achieve a charming, rustic look in your kitchen with twine-wrapped jars. This simple project is incredibly easy and adds a touch of warmth and texture to your decor. These jars are ideal for holding utensils, storing dry goods, or displaying flowers. The natural texture of the twine complements various kitchen styles, from farmhouse to bohemian. These twine-wrapped jars offer a quick and affordable way to enhance your kitchen’s ambiance, transforming ordinary jars into stylish decor pieces that will complement any kitchen decor.
Gathering Supplies
To create twine-wrapped jars, gather the following supplies. You’ll need clean glass jars, natural twine (jute or sisal twine works best for a rustic look), hot glue gun and glue sticks, scissors, and any additional decorative elements like lace, burlap, or small embellishments. Choose a twine that is durable and has a consistent thickness for a neat finish. A hot glue gun is essential for adhering the twine to the jar’s surface. Make sure you have an ample supply of glue sticks. Keep a pair of sharp scissors on hand for cutting the twine neatly. You can also gather additional decorative elements like lace, buttons or small charms to personalize the jars.
Wrapping Technique
Start by applying a small amount of hot glue to the top of the jar. Carefully press the end of the twine onto the glue and hold it until it sets. Begin wrapping the twine around the jar, keeping it taut and close together. As you wrap, add small dabs of glue to secure the twine in place. Continue wrapping until the entire jar is covered or until you reach your desired level of coverage. At the end of the wrapping, cut the twine and glue the end securely to the jar. Make sure to press down firmly to secure the twine. For a more polished look, consider wrapping the twine at a slight angle or creating textured patterns. Be careful not to burn yourself with the hot glue.
Decorative Embellishments

Add decorative embellishments to your twine-wrapped jars to enhance their visual appeal. Consider adding lace ribbons, burlap strips, or small wooden tags. You can also attach buttons, beads, or small charms to the twine using hot glue. For a more elegant look, use metallic twine or add glitter. To adhere the embellishments, simply apply a small amount of hot glue and carefully attach them to the jar. Be mindful of the overall aesthetic and select embellishments that complement the rustic charm of the twine. The possibilities for customization are endless, allowing you to create jars that perfectly match your kitchen decor.
Idea 3: Chalkboard Painted Jars
Chalkboard painted jars are incredibly versatile and practical for kitchen decor. They offer a stylish way to label pantry items, store spices, or even create a cute message board. The chalkboard surface allows you to customize the jars as needed, making them a flexible and functional addition to your kitchen. These jars are not only great for organization but also provide a fun and creative outlet for displaying messages or drawing. The chalkboard paint provides a unique surface that combines practicality and personalized decoration.
Preparing the Jars
Before applying the chalkboard paint, thoroughly clean the glass jars to remove any dust, dirt, or residue. Use warm, soapy water to wash the jars, then rinse them well and let them dry completely. If the jars have labels, remove them carefully. Some labels might leave behind sticky residue, which can be removed with rubbing alcohol or a specialized adhesive remover. Once the jars are clean and dry, you can lightly sand the surface with fine-grit sandpaper to help the paint adhere better, especially if the jars are smooth. Wiping the jars with a tack cloth after sanding will remove any sanding dust.
Applying Chalkboard Paint

Apply chalkboard paint to the jars using a brush or spray. If using a brush, apply thin, even coats, allowing each coat to dry completely before applying the next. For a smoother finish, consider using a foam brush. If you choose to spray the paint, make sure to do so in a well-ventilated area and apply thin, even coats to prevent drips. You might need two or three coats to achieve full coverage. After the final coat has dried completely, cure the chalkboard paint by rubbing the side of a piece of chalk all over the surface, then wiping it off. This process helps the surface accept chalk and prevents ghosting. Make sure the paint is completely dry, before using the jars.
Creative Labeling with Chalk
Once the chalkboard paint is dry and cured, you can start labeling your jars. Use chalk or chalk markers to write the contents of each jar, create decorative designs, or write inspiring messages. Experiment with different fonts and styles to personalize the jars. If you make a mistake, simply wipe the chalk away with a damp cloth and start over. You can also use stencils to create more elaborate designs or consistent lettering. Consider using colored chalk for a more vibrant and eye-catching look. To make your labels smudge-proof, apply a clear sealant over the chalk after you’ve written on the jars. This will preserve your designs and prevent the chalk from wearing off over time.
Idea 4: Mason Jar Soap Dispensers
Create stylish and practical mason jar soap dispensers to add a touch of elegance to your kitchen. These dispensers are both functional and visually appealing, making them a great DIY project. They can add a rustic charm to your kitchen sink area. They’re also a more cost-effective and eco-friendly alternative to store-bought soap dispensers, as you can easily refill them with your favorite soaps. The combination of functionality and style makes these dispensers a must-try DIY project for any kitchen decor enthusiast.
Assembling the Dispenser

To assemble the mason jar soap dispenser, you’ll need a mason jar, a soap dispenser pump (usually from a repurposed soap bottle), a drill, a drill bit sized to fit the pump stem, and a rubber washer (optional, for a better seal). Start by drilling a hole in the mason jar lid. Measure the diameter of the pump stem and choose a drill bit that is slightly smaller for a snug fit. Carefully drill a hole in the center of the lid. Insert the pump stem through the hole from the top. If desired, use a rubber washer to create a better seal between the pump and the lid. Screw the lid onto the mason jar.
Customizing the Dispensers
Customize your mason jar soap dispensers to match your kitchen decor. You can paint the jars, add twine or ribbon, or attach labels. Consider using acrylic paints to create unique designs, or use chalkboard paint to add labels. Wrap the jar with twine for a rustic look, or use decorative ribbon for a touch of elegance. You can also add embellishments like beads, charms, or small decorative elements. Another popular option is to add a metal band around the jar. Mix and match different jars and pump styles to find the perfect fit for your kitchen. Be sure to test your customization methods to ensure they are waterproof and durable.
Filling and Using
Once your soap dispenser is assembled and customized, it’s time to fill it with your favorite liquid soap. Unscrew the lid from the mason jar, pour in the soap, and replace the lid. Choose a soap that complements your kitchen decor. You can use both store-bought liquid soap or create your own homemade soap using essential oils and natural ingredients. Test the pump to ensure it dispenses the soap smoothly. If the pump is stiff, you might need to prime it by pumping it a few times. Position your soap dispenser near the sink, and enjoy the convenience and aesthetic appeal of your new DIY creation. Remember to refill the dispenser when it gets low.
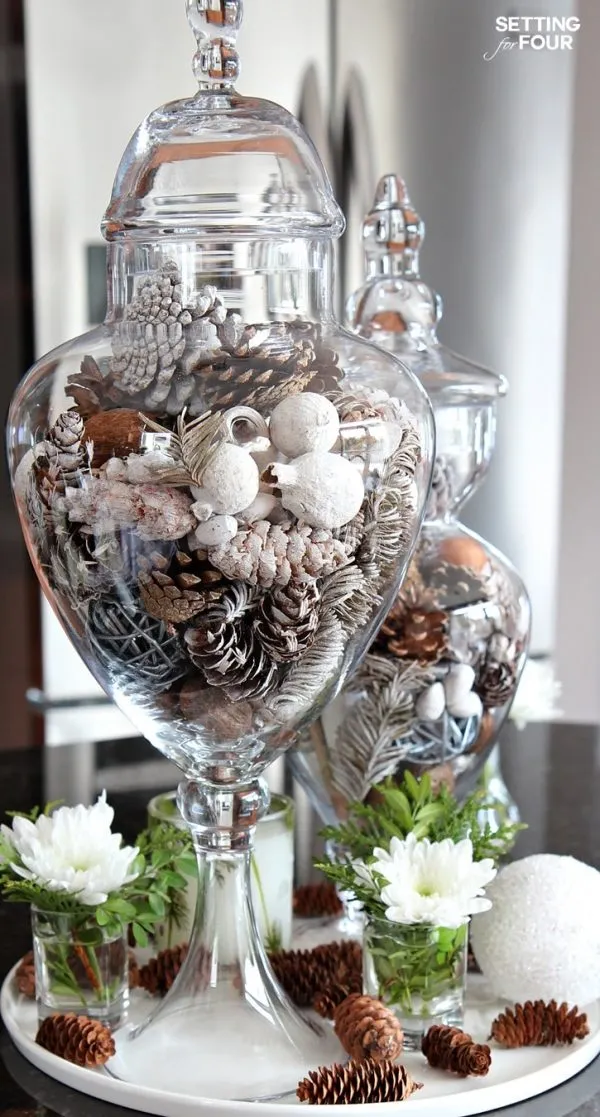
Idea 5: Jar Centerpieces

Jar centerpieces are a simple yet effective way to add a touch of elegance and charm to your kitchen table or countertop. The versatility of jars allows you to create centerpieces for any occasion or season. You can fill the jars with various items to match your kitchen’s decor or the specific holiday. From flowers to candles to decorative objects, the possibilities are endless. Jar centerpieces also create a warm and welcoming atmosphere.
Choosing Filler Items
Select filler items that complement your kitchen’s style and the occasion. For a rustic look, consider using fresh flowers, twigs, or branches. For a modern feel, use decorative stones, marbles, or colored sand. Candles, both real and LED, are a great option for adding warmth and ambiance. You can also use seasonal items, like pinecones in the fall or ornaments during the holidays. When choosing filler items, consider the size and shape of your jars, the color scheme of your kitchen, and the overall look you’re trying to achieve. Mixing different textures and materials can create a more visually interesting centerpiece. Be sure to pick items that are safe and non-toxic.
Arranging the Centerpiece
Arrange the filler items in your jars creatively. If using flowers, trim the stems to the appropriate length and arrange them in a pleasing manner. For candles, place them directly in the jars or use decorative holders. When using decorative stones or sand, layer them in the jars to create interesting patterns. Consider using a variety of jar sizes and shapes to create a more dynamic centerpiece. Arrange the jars in a group, or place them individually along the table or countertop. Remember to consider the overall balance and visual appeal of the arrangement. Don’t overcrowd the jars, and allow the items to be visible.
Adding Finishing Touches
Add finishing touches to your jar centerpieces to elevate their appearance. Consider adding ribbons, twine, or other decorative elements to the jars. You can also place the jars on a decorative tray or runner to create a cohesive look. Small embellishments like beads, charms, or seasonal decorations can add a personalized touch. Lighting can also enhance the centerpiece, particularly at night. Use fairy lights inside the jars, or place candles nearby to create a warm and inviting atmosphere. Make sure the finishing touches complement the filler items and the overall style of your kitchen. The small details can significantly improve the overall aesthetic of your jar centerpieces.
In conclusion, DIY kitchen decor jars offer a fantastic way to enhance your kitchen’s style and functionality. These five creative ideas provide a starting point for transforming ordinary jars into beautiful and practical decor pieces. From painted herb jars to rustic twine-wrapped designs, chalkboard-painted jars, mason jar soap dispensers, and charming centerpieces, there’s a project for every taste and skill level. Embrace your creativity and use these ideas as inspiration to create unique and personalized decor that reflects your style. Happy crafting!